目次
関連記事一覧
OculusQuest2(その1) VRで物を掴む投げる離す
OculusQuest2(その2) ワープ移動←今回の記事
はじめに
前回に引き続き、今回はVRのワープ移動について書いていきます。
ワープ移動はほとんどの移動が必要なVRゲームに実装されている方法です。
ワープ移動のほかに、FPSゲームのように入力された方向にスムーズに移動する方法があります。
しかし、この移動方法はVRの視点に慣れていないと酔ってしまうため、移動はワープ移動で実装するのが無難かとおもいます。
最後にソースコード全体と、使い方も紹介します。
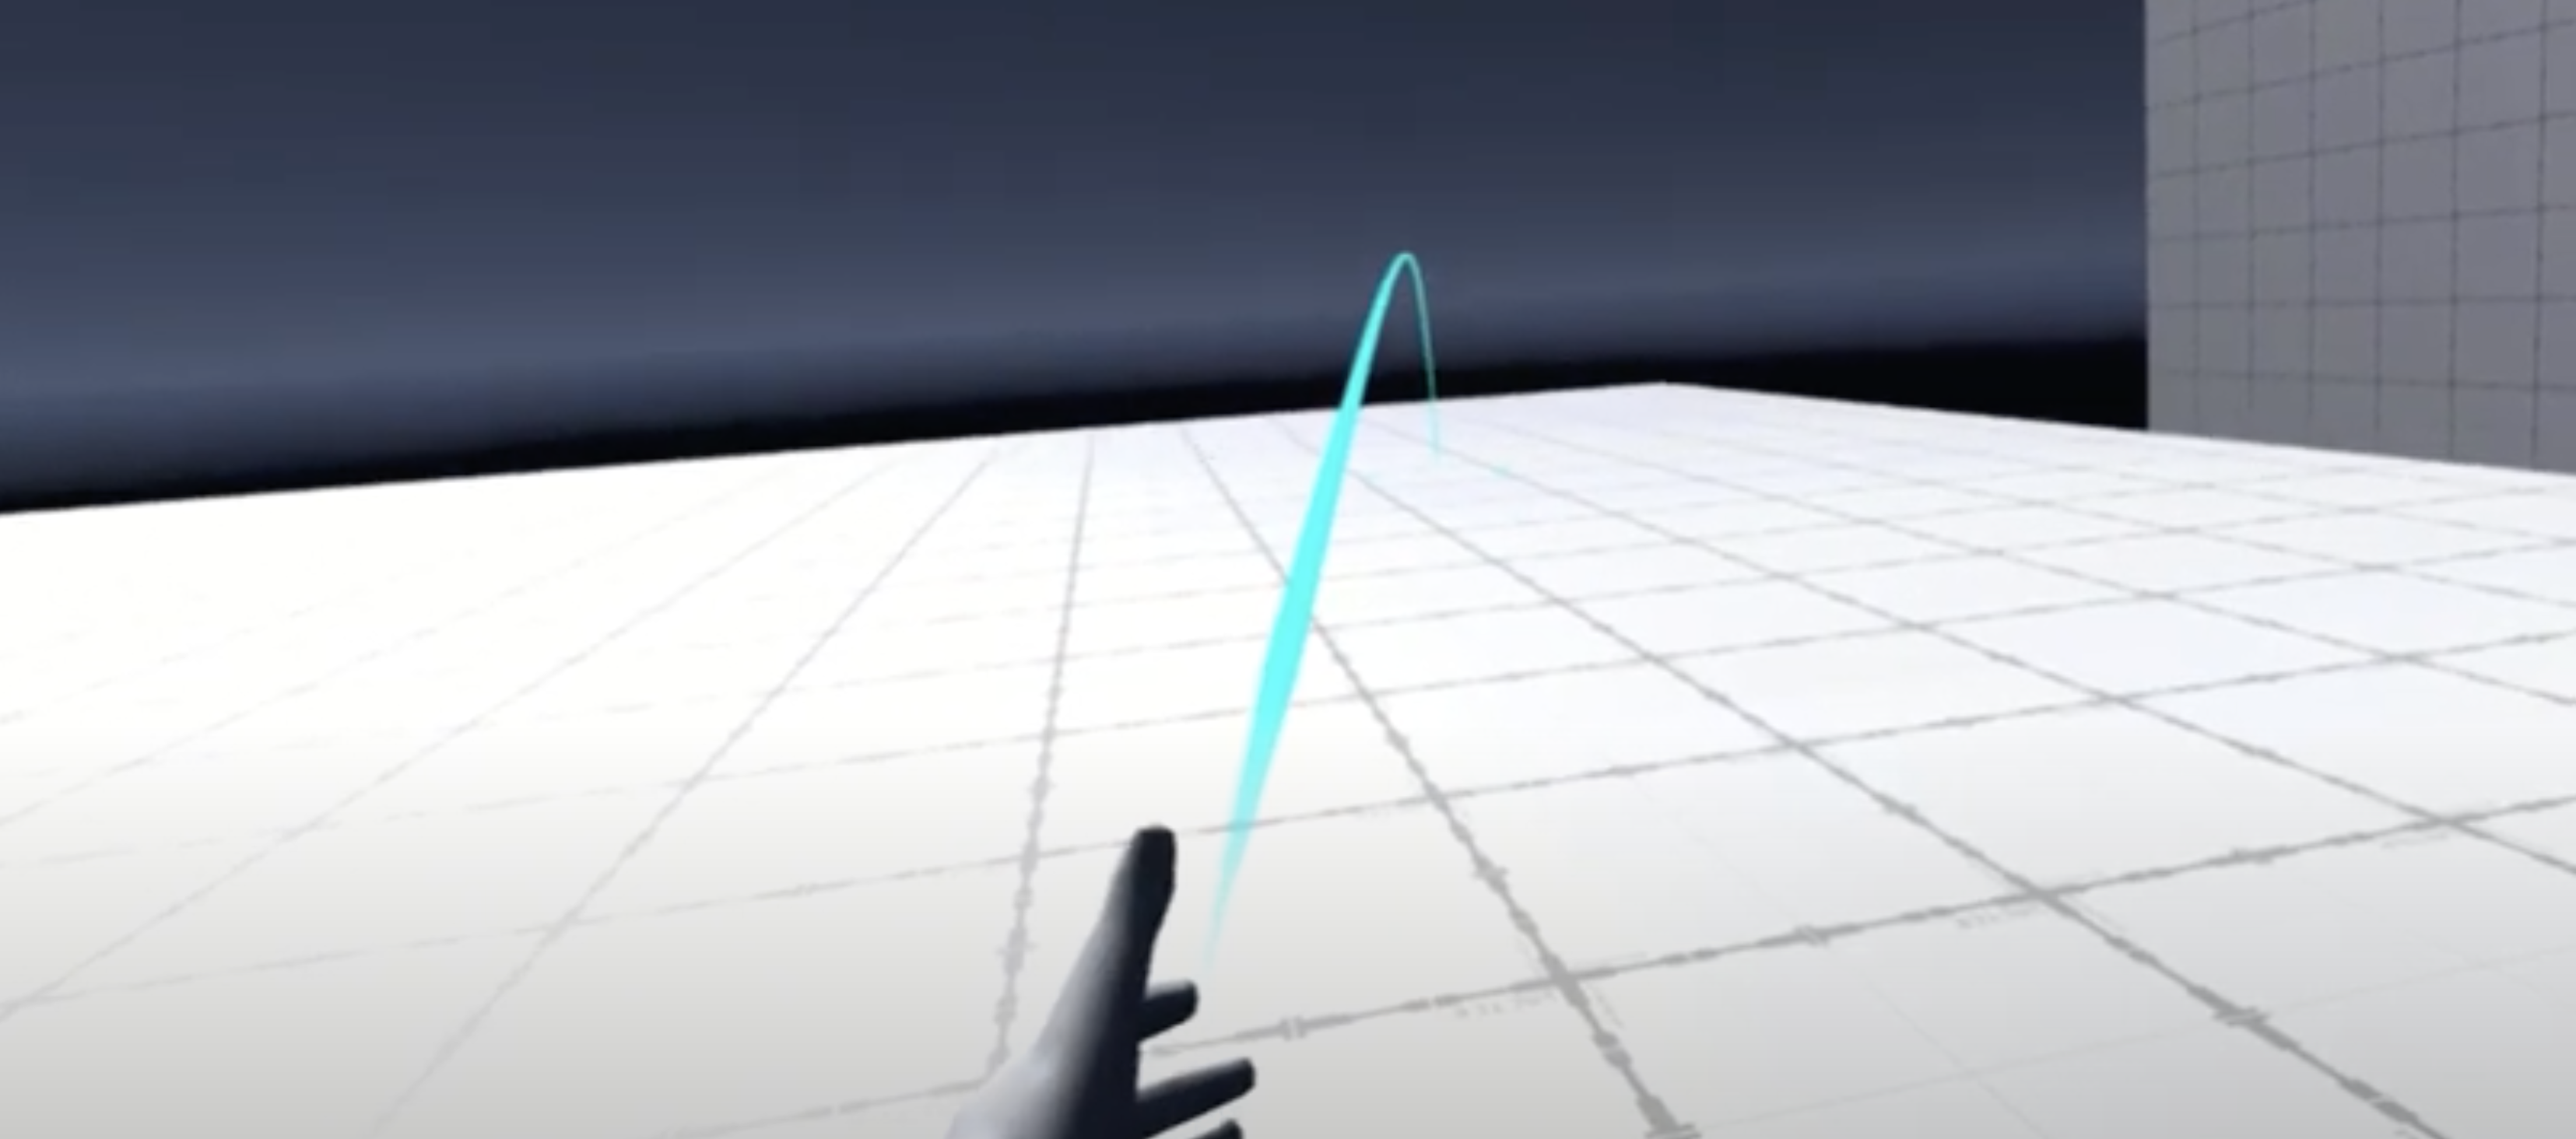
今回作成したサンプル
2つの操作
2種類の入力を判定して、ワープ移動と回転を実装しました。
1.回転
回転は今回のメインの内容ではありませんが、特に難しい実装はありません。
はじめにも書きました通り、スムーズに視界が動くと酔うのでスティックを倒した時45度間隔で回転させています。
コードは以下の二つです
入力判定Unirx使用
|
1 2 3 4 5 |
this.UpdateAsObservable().Select(_ => OVRInput.Get(OVRInput.RawAxis2D.RThumbstick).x) .Buffer(2, 1) .Where(list => Mathf.Abs(list[0]) < 0.1f && Mathf.Abs(list[1]) >= 0.1f) .Select(list => list[1]) .Subscribe(Rotate).AddTo(this); |
初期化時に上記を登録します。
UpdateAsObservableは毎フレームの処理を登録するためのものです。
Selectでは、コントローラーの右スティックのX軸の値(-1f~1f)を選択。
Bufferでは、2フレーム分の入力をまとめて、後の処理に流します。
Whereでは、list[0]には前フレームの入力、list[1]には現在のフレームの入力が入ります。
そして、0.1fの境界をまたいだ瞬間のみ次に処理を回します。(それ以外はブロックされます)
2つ目のSelectで、現在の入力値を選択。
Subscribeで回転処理を実行します。
AddToはthisが破棄されたときに購読を破棄するという指定をしています。
このようにUnirxを使用すると、コンパクトに入力判定ができます。
回転の実装
|
1 2 3 4 5 6 7 8 9 10 11 12 13 14 15 16 17 18 19 |
[SerializeField] private float _rotDegree = 45f; private void Rotate(float inXAxis) { if (_isMove) { return; } if (inXAxis > 0f) { // 右回転 transform.rotation *= Quaternion.AngleAxis(_rotDegree, Vector3.up); } else { // 左回転 transform.rotation *= Quaternion.AngleAxis(-_rotDegree, Vector3.up); } } |
移動中は回転させないようにし、スティックの倒された方向によって回転させます。
2.ワープ移動
今回の本題です。
入力の判定は、回転よりはシンプルです。
|
1 |
this.UpdateAsObservable().Select(_ => OVRInput.Get(OVRInput.RawAxis2D.LThumbstick).y).Subscribe(WarpMove).AddTo(this); |
左スティックのY入力値をそのままWarpMoveに渡します。
|
1 2 3 4 5 6 7 8 9 10 11 12 13 14 15 16 17 18 19 20 21 22 23 24 25 26 27 28 29 30 31 32 33 34 |
// 左手のトランスフォーム [SerializeField] private Transform _leftHandTrans; [SerializeField] private GameObject _circleObj; private LineRenderer _lineRenderer; bool _isMove = false; private void WarpMove(float inYAxis) { if (inYAxis > 0.5f) { // 左スティックが前方向に倒されたとき _circleObj.SetActive(true); float distance = CalcDistance(); Vector3 circlePos = transform.position; Vector3 handForward = _leftHandTrans.forward.normalized; circlePos.z += distance * handForward.z; circlePos.x += distance * handForward.x; _circleObj.transform.position = circlePos; SetLine(_leftHandTrans.position, circlePos); _isMove = true; } else { // スティックが離されているとき _circleObj.SetActive(false); _lineRenderer.enabled = false; if (_isMove) { // スティックが離された瞬間 _isMove = false; transform.position = _circleObj.transform.position; } } } |
スティックが前方向に倒されたときに、サークル位置と放物線の計算を行い、
スティックが離されたときに、サークルの位置まで自分自身を瞬間移動させています。
順に処理を解説していきます。
ワープ位置の計算
距離の計算
始めに自分からどのくらい離れた位置にサークルを置くか計算します。
(距離のみで、方向はまだ計算しません)
|
1 2 3 4 5 6 7 8 9 10 11 12 13 14 15 16 17 18 19 20 21 22 23 24 25 26 27 |
// 左手のトランスフォーム [SerializeField] private Transform _leftHandTrans; [SerializeField, Range(0f, 1f)] private float _maxDegree = 0.75f; [SerializeField, Range(0f, 1f)] private float _minDegree = 0.1f; [SerializeField] private float _maxDistance = 5f; [SerializeField] private float _minDistance = 0.5f; float CalcDistance() { float degree = Mathf.Abs(_leftHandTrans.forward.y); if (degree < _minDegree) { return _maxDistance; } if (degree > _maxDegree) { return _minDistance; } float distance = 0f; float delta = degree - _minDegree; float prop = 1f - (delta / (_maxDegree - _minDegree)); distance = _maxDistance * prop; return Mathf.Max(_minDistance, distance); } |
距離は左コントローラーの正面方向のY軸の値で決定しています。
真上を向いているときは1
水平方向の時は0
真下を向いているときは-1
の値になります。
操作性の都合で、
真上を向いているときは0.75f
水平方向の時は-0.1f~0.1f
真下を向いているときは-0.75f
に変換しています。
Y軸の値が0に近づくほどサークルを遠くに
1fまたは-1fに近づくほどサークルを近くになるようにしています。
方向の計算
前回の方法で距離を求めたあと、コントローラーの向きでサークルの位置を決定します。
|
1 2 3 4 5 6 |
float distance = CalcDistance(); Vector3 circlePos = transform.position; Vector3 handForward = _leftHandTrans.forward.normalized; circlePos.z += distance * handForward.z; circlePos.x += distance * handForward.x; _circleObj.transform.position = circlePos; |
ベジェ曲線
ワープ線の表示はベジェ曲線の計算を利用しています。
2次ベジェ曲線と3次ベジェ曲線がありますが、
今回は2つの点の間を一つのコントロールポイントで制御する2次ベジェ曲線を用います。
UnityのVector3クラスにはLerp関数が用意されているので計算自体はシンプルです。
|
1 2 3 4 5 6 7 8 9 10 |
/// <param name="from">始点</param> /// <param name="to">終点</param> /// <param name="p">コントロールポイント</param> /// <param name="t">補完値0f~1f</param> Vector3 GetBezierPoint(Vector3 from, Vector3 to, Vector3 p, float t) { Vector3 m1 = Vector3.Lerp(from, p, t); Vector3 m2 = Vector3.Lerp(p, to, t); return Vector3.Lerp(m1, m2, t); } |
fromには自分の立ち位置をtoにはサークルの位置を渡して計算します。
pはコントロールポイントで、曲がり具合を決定する要因になります。
tには0f~1fの値を等間隔で分割して渡していくことで、放物線のポイントを取得していきます。
文章では分かりづらいので、ポイントを求める手順を動画にしました。
求められたmpをつないでいくことによって結果的に、放物線が出来上がります。
コントロールポイント(p)によって放物線の曲がり具合が決まるため、
今回作成したVRサンプルでは、コントローラーの上下の傾きによってpの位置を変更しています。
詳しくは、最後の全体ソースコードをご参照ください。
ソースコード
今回作成したソースコードです。
コード内で以下のライブラリを使用しています。
UniRx
https://assetstore.unity.com/packages/tools/integration/unirx-reactive-extensions-for-unity-17276
|
1 2 3 4 5 6 7 8 9 10 11 12 13 14 15 16 17 18 19 20 21 22 23 24 25 26 27 28 29 30 31 32 33 34 35 36 37 38 39 40 41 42 43 44 45 46 47 48 49 50 51 52 53 54 55 56 57 58 59 60 61 62 63 64 65 66 67 68 69 70 71 72 73 74 75 76 77 78 79 80 81 82 83 84 85 86 87 88 89 90 91 92 93 94 95 96 97 98 99 100 101 102 103 104 105 106 107 108 109 110 111 112 113 114 115 116 117 118 119 120 121 122 123 124 125 126 127 128 129 130 131 132 133 134 135 136 137 138 139 140 141 142 143 144 145 146 147 148 149 150 151 152 153 154 155 156 157 158 |
using System.Collections.Generic; using UnityEngine; using UniRx; using UniRx.Triggers; [RequireComponent(typeof(LineRenderer))] public class VRWarpMove : MonoBehaviour { // 左手のトランスフォーム [SerializeField] private Transform _leftHandTrans; [SerializeField, Range(0f, 1f)] private float _maxDegree = 0.75f; [SerializeField, Range(0f, 1f)] private float _minDegree = 0.1f; [SerializeField] private float _maxDistance = 5f; [SerializeField] private float _minDistance = 0.5f; // rotation [SerializeField] private float _rotDegree = 45f; // objects [SerializeField] private GameObject _circleObj; private LineRenderer _lineRenderer; void Awake() { _lineRenderer = GetComponent<LineRenderer>(); } void Start() { this.UpdateAsObservable().Select(_ => OVRInput.Get(OVRInput.RawAxis2D.LThumbstick).y).Subscribe(WarpMove).AddTo(this); this.UpdateAsObservable().Select(_ => OVRInput.Get(OVRInput.RawAxis2D.RThumbstick).x) .Buffer(2, 1) .Where(list => Mathf.Abs(list[0]) < 0.1f && Mathf.Abs(list[1]) >= 0.1f) .Select(list => list[1]) .Subscribe(Rotate).AddTo(this); } bool _isMove = false; private void WarpMove(float inYAxis) { if (inYAxis > 0.5f) { // 左スティックが前方向に倒されたとき _circleObj.SetActive(true); float distance = CalcDistance(); Vector3 circlePos = transform.position; Vector3 handForward = _leftHandTrans.forward.normalized; circlePos.z += distance * handForward.z; circlePos.x += distance * handForward.x; _circleObj.transform.position = circlePos; SetLine(_leftHandTrans.position, circlePos); _isMove = true; } else { // スティックが離されているとき _circleObj.SetActive(false); _lineRenderer.enabled = false; if (_isMove) { // スティックが離された瞬間 _isMove = false; transform.position = _circleObj.transform.position; } } } private void Rotate(float inXAxis) { if (_isMove) { return; } if (inXAxis > 0f) { // 右回転 transform.rotation *= Quaternion.AngleAxis(_rotDegree, Vector3.up); } else { // 左回転 transform.rotation *= Quaternion.AngleAxis(-_rotDegree, Vector3.up); } } float CalcDistance() { float degree = Mathf.Abs(_leftHandTrans.forward.y); if (degree < _minDegree) { return _maxDistance; } if (degree > _maxDegree) { return _minDistance; } float distance = 0f; float delta = degree - _minDegree; float prop = 1f - (delta / (_maxDegree - _minDegree)); distance = _maxDistance * prop; return Mathf.Max(_minDistance, distance); } void SetLine(Vector3 from, Vector3 to) { _lineRenderer.enabled = true; int divCount = 50; Vector3 up = Vector3.up; float handForwardY = _leftHandTrans.forward.y; if (handForwardY < 0f) { handForwardY *= 2f + 1f * Mathf.Abs(handForwardY); } up *= 2f + handForwardY; if (up.y < 0f) { up.y = 0f; } var points = GetBezierPoints(from, to, Vector3.Lerp(from, to, 0.75f) + up, divCount); _lineRenderer.positionCount = points.Length; _lineRenderer.SetPositions(points); } Vector3[] GetBezierPoints(Vector3 from, Vector3 to, Vector3 p, int divCount) { List<Vector3> ret = new List<Vector3>(); float delta = 1f / divCount; float t = 0f; while (t < 1f) { ret.Add(GetBezierPoint(from, to, p, t)); t += delta; } t = 1f; ret.Add(GetBezierPoint(from, to, p, t)); return ret.ToArray(); } /// <summary> /// ベジェ曲線の計算 /// </summary> /// <param name="from">始点</param> /// <param name="to">終点</param> /// <param name="p">コントロールポイント</param> /// <param name="t">補完値0f~1f</param> Vector3 GetBezierPoint(Vector3 from, Vector3 to, Vector3 p, float t) { Vector3 m1 = Vector3.Lerp(from, p, t); Vector3 m2 = Vector3.Lerp(p, to, t); return Vector3.Lerp(m1, m2, t); } } |

Playerの構成に関しましては前回の記事をご参照ください。
| 名前 | 説明 |
|---|---|
| MaxDegree | コントローラのY軸の、最大距離と判定する範囲(以上) |
| MinDegree | コントローラのY軸の、最小距離と判定する範囲 |
| MaxDistance | 移動する最大の距離 |
| MinDistance | 移動する最低の距離 |
| RotDegree | 何度ずつ回転するか |
こちらサークルの画像です、ご自由にお使いください。


